
Tutorial: How to create a Hashtag + Entry Form Contest Follow

The “Hashtag + Entry Form” contest allows you to organize a contest where users can participate with the photos they have posted on their own Instagram profile with a specific hashtag. The users have to identify with their Instagram profile and automatically they can select the photo from their account that has the contest hashtag. They should also fill in the entry form which is completely customizable.
The content of the tutorial is as follows:
-
General description
-
What’s the user experience like?
-
How is the participation flow of the user
-
Create the promotion
-
Set up of the Hashtag+Entry form Contest
-
Step 1. Configure the contest hashtag
-
Step 2. Participant registration system
-
Step 3. Customize the Gallery page
-
Step 4. Enable the voting (optional)
-
Customize the design and finish the settings
-
Manage and publish the winners
1. General description
The Hashtag+Entry form contest will allow you to create a photo contest for Instagram users and followers. Users will take a photo with your campaign theme and will share it on their profile with the campaign hashtag. Then they will confirm their competition entry by filling in a form, choosing which photo to enter, accepting the terms & conditions, and agreeing to any other requirements listed in the form.
The Hashtag+Entry form contest will allow you to:
- Completely customize the registration form with the data you want to obtain from the participants.
- Publicly display the photos uploaded by users in the contest gallery and enable the voting system so that the photos can be voted.
- Pre-moderate competition entries to control which images appear in the gallery.
- Decide how you want to determine the winner/s of the contest: by votes, through a jury or by a random draw.
Note: Do you want to organize a photo or video contest on Instagram but without entry form? Then have a look at the “Mention + Hashtag” that allow users to participate directly from Instagram by posting a photo or video with the contest hashtag and a mention of the organizing brand.
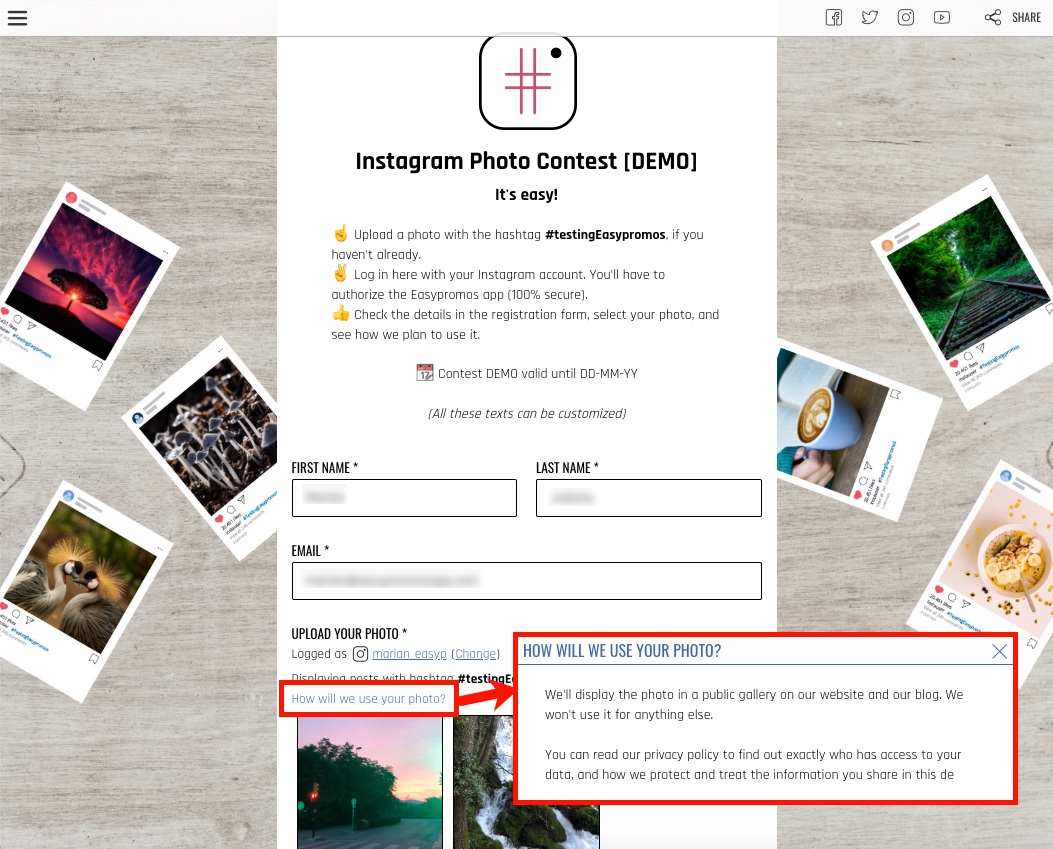
2. What’s the user experience like?
To participate in the contest, the users should access the contest through the link that the organizer provides. On accessing the entry form, the users will be asked to fill in all the required fields. In this step the user will be able to connect his Instagram profile and select the photo with the hashtag that he has published on his Instagram profile.
You can see the user experience of participating in a Hashtag + Entry Form contest in the following video:
3. How is the participation flow of the user
What will the user experience be like? The promotion is made up of different pages that the user will find when interacting with the promotion to participate, such as: the initial welcome page, the registration page, where the user will register with their data, the final page, etc. As a whole, the different pages will make up the structure of the promotion and the flow of participation that the user will follow to complete the promotional mechanics of the promotion.
In particular, in an Entry form giveaway, the participation flow will be as follows:
1. When accessing the promotion for the first time, the user will access the Welcome page, and when clicking on the main button to start participating, the next page they will see will be the registration form page.
2. The user will need to fill in the form with all the information requested by the administrator, as well as connect their Instagram account in order to select the picture from their feed.
3. Once the registration form has been completed, the user will access the final page where the thank you message will appear, confirming that they have registered correctly.
4. Create the promotion
How to start creating the Hashtag + Entry Form Contest? We present the following tutorial that will allow you to know the first steps to create your promotion so that you do not miss any important point. You will learn all the general management options that you have available as an administrator in your internal dashboard to manage and edit the promotion.
5. Set up of the Hashtag+Entry form Contest
Here we explain all the steps to create your Hashtag+Entry form Contest.
Step 1. Configure the Hashtag + Entry Form contest
Next you should configure the hashtag of the contest that the users should add in their Instagram post:
1. Enter the ‘Editor’ of the promotion.
2. Go to Editor > Registred Form > Fields > Media Field. This section allows you to quickly configure the following two aspects:
- Contest hashtag. Write is without the #.
- How will you use the images? (mandatory field). In this field you need to write what you will use the images from the participants to. For example: We will only use images internally, in order to check that their content is appropriate and conforms with the requirements in our Terms and Conditions; We will publish all images from the contest in a public gallery, to be displayed on our social media and our website.
The system will save the hashtag that you write in this first step but you can modify it later if necessary. Now you can concentrate on customizing the different pages of the contest as we explain in the following step.
Step 2. Participant registration system
In order to participate in the Hashtag+Entry form Contest, users must register by filling in the registration form with the requested data.
To do this, go to the Editor > Pages > Registration Form, to customize the fields that you want to ask users to be able to participate:
You will see that the registration form comes with the "Media" field enabled. This field will allow users to upload their Instagram photo. The "Comments" field is also enabled, which will allow to obtain the text of the Instagram publication itself, as it will be pre-filled with the text of the photo, although the user can edit the content if they wish.
Check the tutorial where we explain how to configure the promotion registration form.
Step 3. Customize the Gallery page
Set up a public gallery where all the participants' photos will be displayed. In this section, you should focus on the following tabs:
1. Contents: You can upload a header image to give the gallery a more corporate touch. You can also add an introduction message.
2. Layout: By default, pictures are presented in a vertical gallery, one below the other, but you can activate the tiled gallery layout, which displays more than one picture on the same line, making a more visually attractive collage.
Note: You can enable pre-moderation so that the entries are not published automatically but remain as pending so that you can review them beforehand.
3. Options: You will find the following options:
- Entries per page. This option allows to set up the number of pictures displayed per page within the Gallery.
- Order entries. This option allows to set up how you want the pictures to be ordered on the Gallery:
-
- Most recent first.
- Randomly.
- Most voted first.
-
- Anonymous participation. Activate this if you don’t want users' names and profiles displayed in the gallery.
Step 4. Enable the voting (optional)
Access the "Votes" tab if you want to allow users to vote on entries.
By default, the Hashtag + Entry Form contest comes with the voting system enabled. You can set up what type of voting system you wish to use. You can also disable the voting system from here. Check here how the voting system works and all the configuration options.
This section allows many other possibilities:
6. Customize the design and finish the settings
Once you have configured the Hashtag+Entry form contest, the next step is to finish the configuration of the other options of the promotion, such as customizing the design template with your own colors and texts, introducing the legal bases, the viral content settings, etc. Check the tutorial to finish the configuration and customization of your promotion.
7. Manage and publish the winners
Easypromos provides a complete Prize and Winners Management system that will allow you to create the prize or prizes that you want to give to the users who participate in the contest, as well as configure how you want to assign the prizes and select the winners.
Specifically, for the Hashtag+Entry form Contest you have two ways to assign the prize to the winners, according to your choice:
1. Randomly: You can run one or more draw among participants, or among a segment of participants, and obtain a certificate of validity with the results. Follow the steps of this tutorial to run the draw.
2. Manually: You can assign one or more prizes manually to your chosen winners. This is useful in voting contests and skills tests. We also recommend this option if your winners are selected by a jury, notary public, or the organizing brand. Follow the steps of this tutorial to assign the prizes manually.
Comments
0 comments
Please sign in to leave a comment.