
Tutorial: How to create a Scenes Contest Follow

The Scenes Contest allows you to add extra entertainment to your contests and to surprise the users with fun games and dynamics. You can upload your own background images that will be the scenes where the users can play and bring their imagination to life: you can ask the participants to select a background (scene) and customize it with stickers.
In this tutorial, we explain how to create a Scenes Contest where users can decorate a scene with the brand's own backgrounds and stickers.
What's the user experience like?
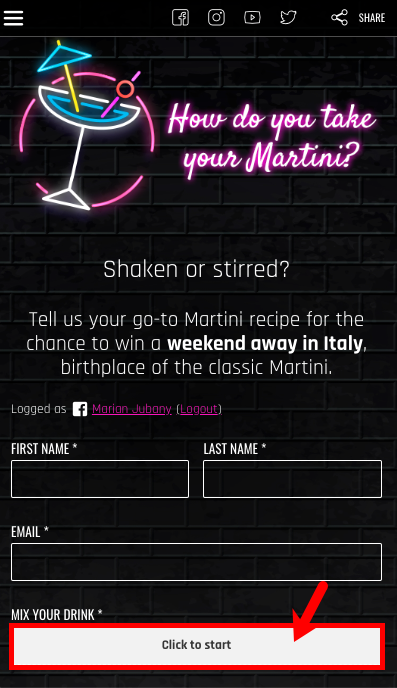
In the video below, you can see how several backgrounds with a drink are presented and the participant can design a scene by selecting one of the backgrounds (scenes) and several stickers (ingredients). After finishing, the participants can download the scenes they've created, they can share them on social networks and the administrator of the contest can send the image to the participants by email:

Do you want to try the user experience for yourself? Try our online DEMO and play with the Scenes feature to design your ideal drink.
Don't miss out on the following steps and discover how you can create your own Scenes Contest.
Contents of this tutorial
- Step 1. Access the control panel
- Step 2. Create a "Scenes" app
- Step 3. Configure your Scenes
- Step 4. How to send the Scene to each participant by email
- Step 5. Finish the configuration and customize the contest
Step 1. Access the control panel
Access the Easypromos Control Panel from this link. If you're not an Easypromos user, create an account and sign in to the control panel to create and manage your promotions.
Step 2. Create a "Scenes" app
Next, click on "Create new promotion" and click on the "Scenes" app:
Step 3. Configure your Scenes
Follow these next steps to configure your Scenes:
1. Click on "Editor":
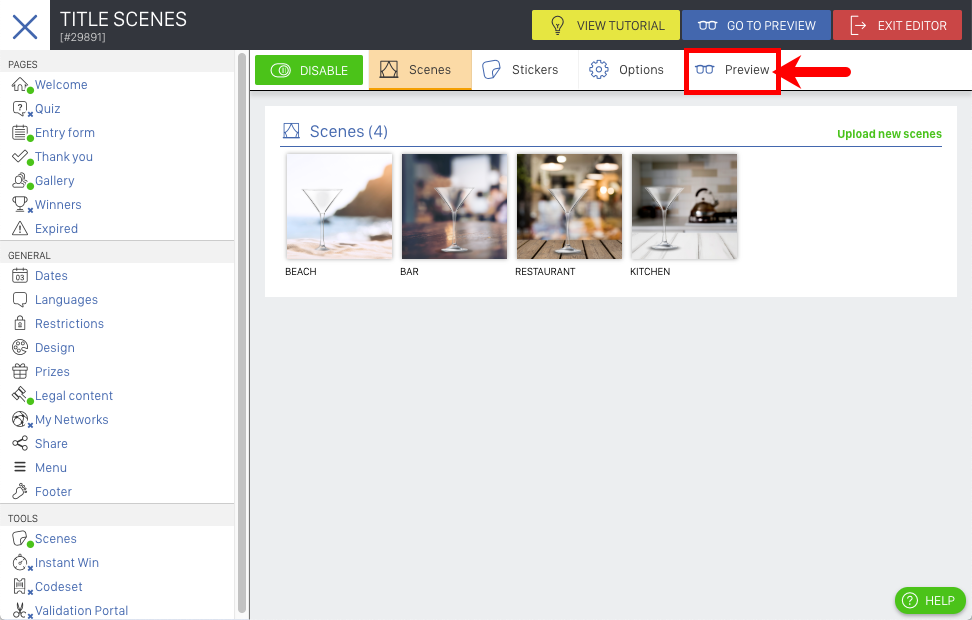
2. Go to Tools > Scenes and you will see all the configuration options divided into the following tabs:
A. Scenes
In this tab, you can upload your own scenes by clicking in the square we show below:
Note: You can upload more than one scene by selecting a folder.
Here are some recommendations for designing the scenes:
- PNG image with transparent background.
- The name of the file will be the public name of the scene.
- Image size. According to your selection of format, the size of the scenes should be:
- Square: 800x800px
- Story: 1127x2008px
- Post: 1200x630px
After following these steps, you should now have your scenes ready:
You can upload more scenes at any time by clicking on "Upload new scenes":
A pop-up window will open where you can upload the scenes:
B. Stickers
In this tab, you can see the default stickers that the platform offers. If you want to upload your own stickers, you should click on the following box:
You can upload more Stickers at any time by clicking on the option "Upload your own stickers":
Next, a pop-up will open where you can upload the stickers:
Here are our recommendations for designing the stickers:
- PNG image with transparent background.
- The name of the file will be the public name of the sticker.
- Recommended size of the stickers: 250x250px
- Tip! You can add a white outline to the stickers to make them stand out more from the background.
Once all your stickers are uploaded, you will have the following options available:
- Reorder stickers: you can decide in what order you want to present the stickers to users.
- Remove stickers.
- Modify the name of the stickers: if you decide to show the name of the stickers, you can modify the name because by default the name of the file is used.
C. Options
In this tab are all the options that you have available for customizing the Scenes Contest:
1. Proportion: This shows the proportion of the image according to the format of the Scene that you selected when enabling the Scenes feature. You can change it here if you wish.
2. Button label: This is the text that shows on the button in the entry form of the contest where users click to go customize their scene.
3. Stickers and Scenes labels: Here you can change the name of these two sections that the users see when they are customizing the Scene:

4. Scaling mode: Here you can select if the users should be able to scale the stickers uniformly (the size of the entire sticker changes), or scale non uniformly (change the height without changing the width), or that is can't be scaled.
5. Display sticker and scene names: Here you select if you want the names of the scenes and stickers to be visible to the participants.
6. Load automatically when user goes to Entry Form. This option allows to open the Scenes tool automatically when you click on the "Participate" button of the promotion, even before the user completes the fields of the entry form.
7. Minimum and maximum number of stickers: Here you define the minimum and the maximum number of stickers the participants can use to customize their scene.
8. Instructions image: This is the image that the user will see first when entering the Scenes feature after clicking the button in the entry form. You can use this image to give the instructions that the users should follow when designing the scene. You can, for example, create an image with the following text:
- Choose a background from the scenes
- Mix your Martini with the ingredients
- Click on Continue to send your drink
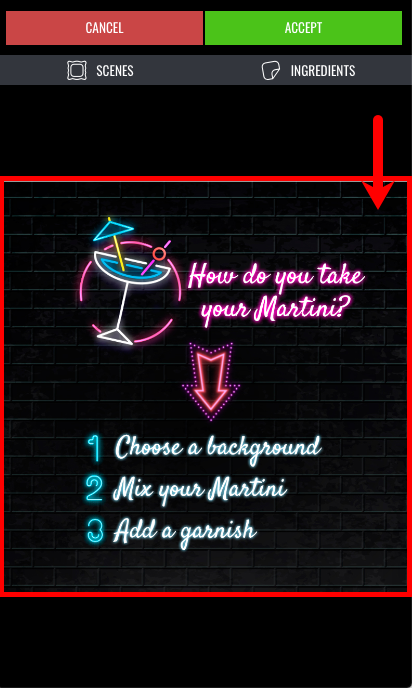
You can click on 'Preview' in the configuration of the scenes to test the user experience:
Step 4. How to send the Scene to each participant by email
You can use the Email Platform to send an email to each of the participants with the image of the scene they've created (in JPEG format), so they can download it, save it on their mobile, share it, send it to their friends, etc.
Step 5. Finish the configuration and customize the contest
Once you have enabled and configured the Scenes feature, the following step is to finish the configuration of the rest of the contest and the customization of all the pages of the promotion. To do this, you can follow the Photo Contest tutorial from Step 2.
Do you want to see some more examples to get inspired to create your own Scenes Contest? Try our DEMOs that have all been created with our Scenes app.
Comments
0 comments
Please sign in to leave a comment.