Emails and Notifications platform 2.0 Follow
Promotions created with the Premium and White Label version of the platform and working with the Login system have the Emails and Notifications Platform 2.0 available, a powerful tool that allows the administrator to create emails to communicate with the promotion participants. In addition, the administrator can also use the tool to receive and send notifications based on user participation.
The content of the present tutorial is organised as follows:
-
General Overview of the Emails and Notifications platform
-
How to access the Emails and Notifications platform 2.0
-
Create and configure emails
-
Email management
-
Creation and setup of the notifications
-
Email search tool
-
Configure common options for the entire email campaign
-
Practical examples of the most common emails configuration
1. General Overview of the Emails and Notifications platform
With the Emails and Notifications Platform you will be able to manage and schedule all communications via email for a promotion or contest. Specifically, the Email Platform allows you to:
- Apply different filters to condition the sending of the email depending on the moment or action realised by the user. For example: you can send an automatic email to the user after registering, or after receiving a prize.
- Segment email recipients. You can decide to which users you want to send the email: to all the participants or only to a group of users according to their characteristics.
- Create and send notifications. You can create emails addressed to the administrators of the promotion or to other external users so that they receive a real-time message in the form of a notification when an event occurs during the promotion. For example, getting notified whenever a new user signs up, getting notified when a user wins a prize, etc.
- Customise the message for each user using smart tags. You can use the variable data (smart tags) to personalise each email with the information of each participant, for example, with their name, the prize they have won, the number of points obtained, etc.
- Personalise your emails with the brand name and logotype. You can configure the message with the name, email, brand signature and upload images to personalise the email template.
- Email search tool. This tool allows you to search for a specific email address and review all the emails that have been sent to that specific user. For each email sent from the platform, you will see if it has been delivered, was rejected or bounced.
2. How to access the Emails and Notifications platform 2.0
You will be able to create all of the emails and notifications from the email platform by entering the "Emails and notifications" section from the promotion management page:
3. Create and configure emails
Once you have accessed the emails and notifications platform, you will be able to create an email and configure it according to your needs:
Below we explain all the aspects that you must configure to create and enable the email:
1. Email type
This option allows you to define the moment in which the email that is being configured should be sent. The sending of the email can be based on an event/action realised by the user in the promotion (register for the first time, participate, etc…), on a scheduled date, or a manual action by the administrator of the promotion to reach out to users.
The system allows you to choose between 4 types of emails:
- Upon registration: This email will be sent automatically when a new user signs up for the promotion for the first time.
- Upon participating: This email will be sent automatically when a registered user completes a stage of participation in the promotion.
- Upon winning a prize: [only for "By probability", "By Instant win", "On participation" or "Manual" prizes]: This email will be sent automatically when a registered user wins a direct prize or has been assigned a prize manually. More information about the prize allocation system.
- Upon losing a prize. This email will be automatically sent when a user voluntarily rejects a prize or when the prize claiming period expires.
- Manual: This email will be sent manually when the administrator executes and confirms the “send” action.
- On a scheduled date: This email will be sent automatically at the date and time defined by the administrator
- On redeem a prize [only if the Prize Redemption Tool is enabled]: This email will be automatically sent when a user redeems a prize.
- Upon losing a specific ranking position [only available in the Games if the Ranking page is enabled]: This email will be automatically sent when a user loses the position number X in the ranking of a game.
- Upon referring a new user. This email will be sent automatically when a user refers a new user.
- Upon completing a virtual coin transaction. This email will be sent automatically when a user completes a virtual coin transaction.
2. Name of the email
Once the email type was selected, the next step will be to give a title to your email, which will work as an internal reference for you to identify it in the list of emails of the promotion.
3. Conditions
In the different emails you create, you will add the relevant conditions to define which users that specific email will be sent to.
By default, when creating a new email it comes without any conditions applied, which means that it will be sent to all participants, since the email does not have any segmentation or filter applied.
To define the user segment that should receive the email, use the conditions to filter the email recipients. Specifically, the Conditions filter has the following characteristics:
- Allows configuring the recipients of the email based on generic users characteristics. Example: filter by users language in the promotion, by country, or according to a specific value of one the registration form fields.
- Additionally, depending on the type of email created, additional filters can be configured for greater segmentation. Examples:
- In a Prize Wheel or in an Instant Win promotion, it will be possible to filter by whether or not the user has won a prize.
- In a game, it will be possible to filter by score obtained.
- In a multi-stage promotion, you can filter by the number of participations in the stage.
- Multiple conditions can be added by combining different filters. Example: Send an email when a user completes a participation in the Prize Wheel stage and, in addition, has participated at least 5 times and has not yet won a prize. In the following screenshot we show how to apply the conditions to send this type of email:
4. Message
Below we present all the options available to personalise the email:
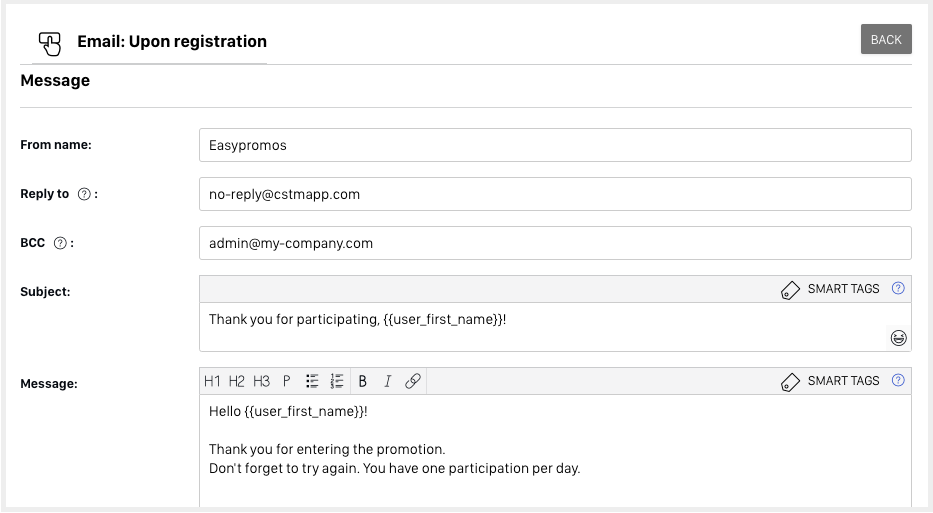
- From name: type the name of the company or brand organising the promotion. Users will see it as the sender of the message. Eg. The friendly Fruit Shop. This field can also be configured from the general "Settings" of the email platform.
- Reply to: Email address that will be used in case the user responds directly to the received email. Important: This is not the sender's email address. The 'From email' sender address is not modifiable and comes with Easypromos domains to minimise spam.
- BCC: This option allows you to indicate a blind copy email (BCC) so that you receive a copy of the same email.
- Subject: write the text that will be presented as the title in the inbox of your participants. Use the content tags or "smart tags" to individualise the subject, for example, with the name of the user who will receive the email.
- Message: Fill in the body of the email and use the content labels or "smart tags" to include personalised information for each user in the email, for example, the name of the prize they have won.
- Attach files: if needed, you can add a document to send next to the message. Documents with JPG, GIF, PNG and PDF format of maximum 1 MB are accepted.
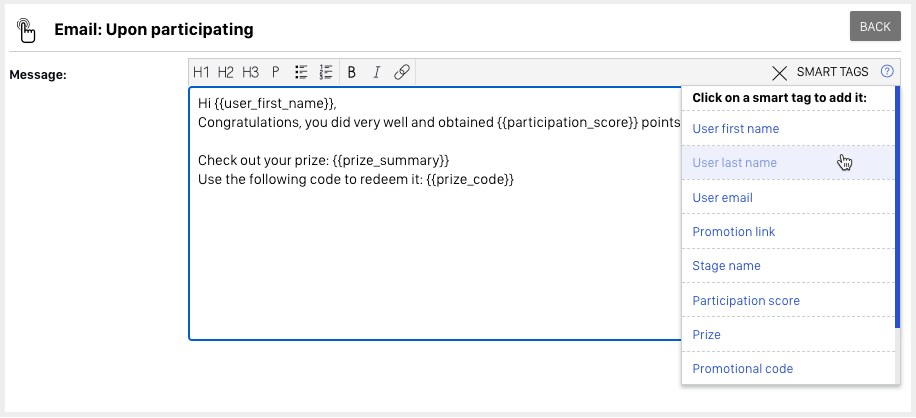
For greater customisation of the email, you can use smart tags, which are labels that will be filled with personalised information from the user, such as their name, their score in the game, or the name of the prize they have won.
Note: In addition to the above smart tags, you will also be able to add smart tags related to the additional text fields and checkboxes present in the promotion registration form, which in this case will show the values entered by the participants in these fields.
4. Emails management
In the list of emails you will see at all times the different types of emails that you have configured and their status.
Next we explain all the email management options available to you:
- A. Enable/Disable the sending of the email (this option appears only for emails of the type "Upon registration", "Upon participating" and "Scheduled date").
- B. Edit the email.
- C. Check the email statistics.
- D. Copy the email.
- E. Preview the email.
- F. Delete the email.
- G. Confirm and send (This option appears only for "Manual" type emails).
5. Creation and setup of the notifications
the email address you specify when certain actions are taken in the promotion.
Specifically, you can create two different types of notifications:
- Receive a notification when a new user registers in the promotion. The notification will be sent every time a new user enters and registers.
- Notify when a participant completes an entry. This notification will be sent each time an already registered user completes a participation in the promotion.
Additionally, you can create more advanced notifications using the different filters, and define the type of notification(s) you want to send, such as:
- Send a notification when a user receives a prize.
- Receive a notification when a user scores a minimum of/over X points.
- Send a notification to the client when a user selects a specific answer on the entry form. (For instance, notify whenever a new user fills in the consent box to receive the newsletter of the company).
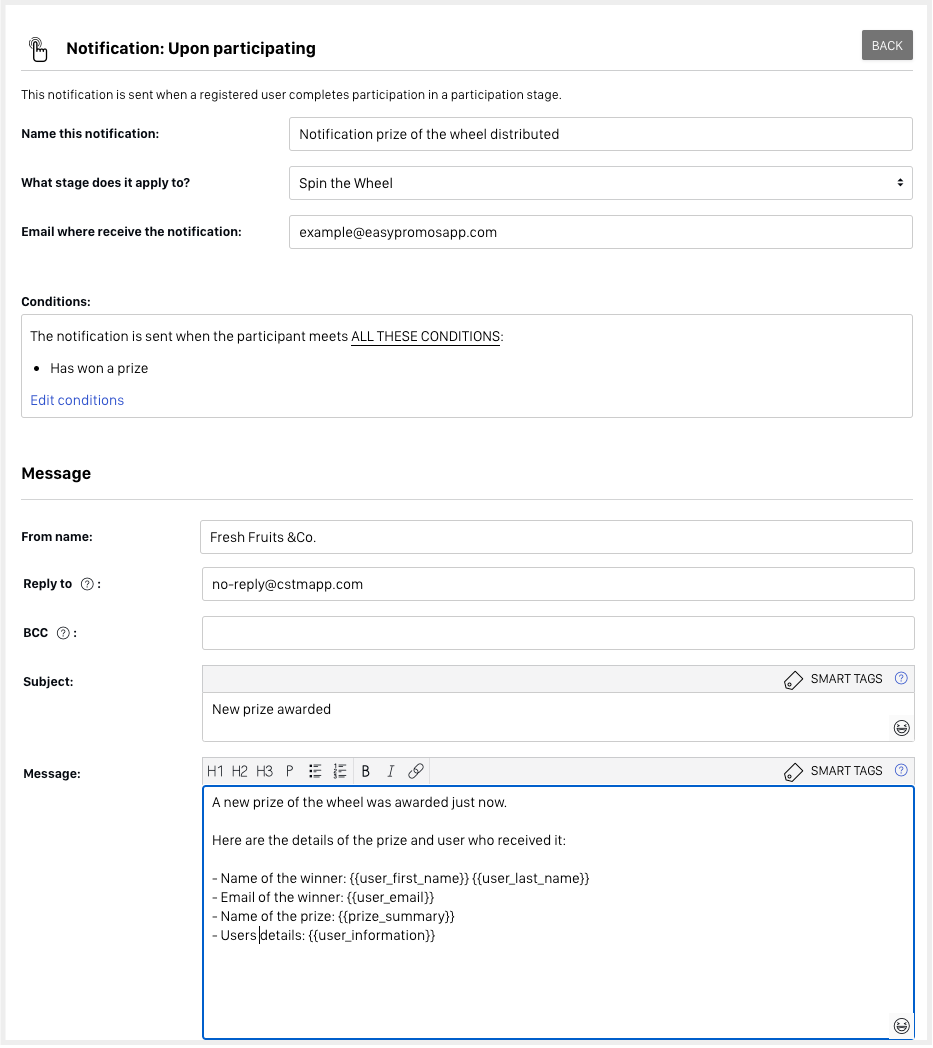
In the screenshot shown below, a notification has been configured to be alerted each time a user wins a prize in a prize wheel, and using the different smart tags to provide detailed information about the winners:
6. Email search Tool
From the "Search email Tool" section you can search for a specific email address to see all the messages that have been sent to that address. In this way, this tool allows the administrator to easily check if the promotion emails are being sent correctly, which can be especially useful in the event that a user has reported that they have not received any communication, or the prize etc.
For each email, you will see the status to review if it has been delivered correctly, was rejected, bounced or could not be delivered because the user has unsubscribed from the promotion emails.
7. Configure common options for the entire mail campaign
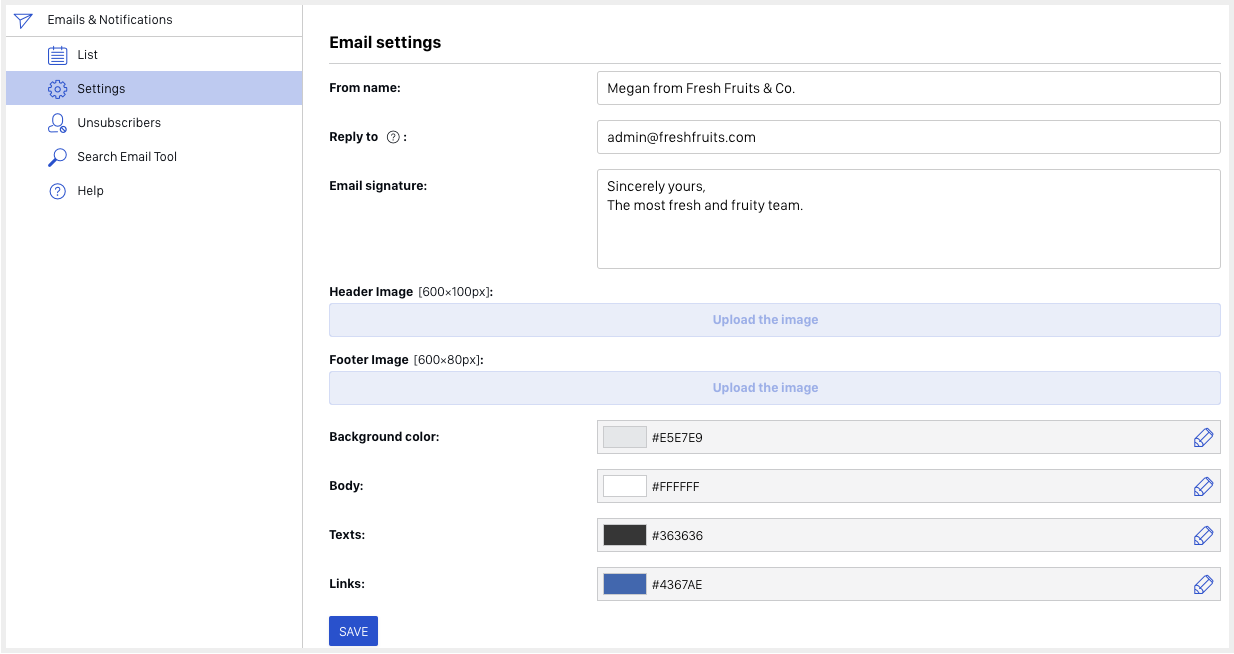
From the "Settings" section you can configure the following options for all the emails that you will send:
- From name: type the name of the company or brand so that users easily identify the sender of all emails.
- Reply to: Email address that will be used in case the user wants to get in touch with the organiser of the promotion and answer to the received email. Important: This is not the sender's email address. The 'From email' sender address cannot be customised and comes with Easypromos domains to minimise spam.
- Email signature: Name and address of the company, for users to easily get in touch/learn more about the sender of the email. Accepts html code.
- Header image: attach a common header image for all emails. Upload here an image with the following characteristics: 600px wide by 100px height.
- Footer image: attach an image to the bottom of the emails, common to all. Upload an image with the following characteristics: 600px wide by 80px height.
- Color customization options: You can customize the colors used in the email:
- Background color.
- Email body color.
- Text colour.
- Color of the links.
Note:no-reply@easypromosapp.com (in Basic and Premium promotions) and no-reply@cstmapp.com <></>(in White Label promotions) will be forced. We do not allow customising the sender's email address to minimise anti-spam systems sending the email to the participant's Spam folder. Easypromos email domains incorporate all the configurations and good practices recommended by Spam detection systems.
8. Practical examples of the most common emails configuration
Next, we explain step by step how to configure automated emails for different objectives:
-
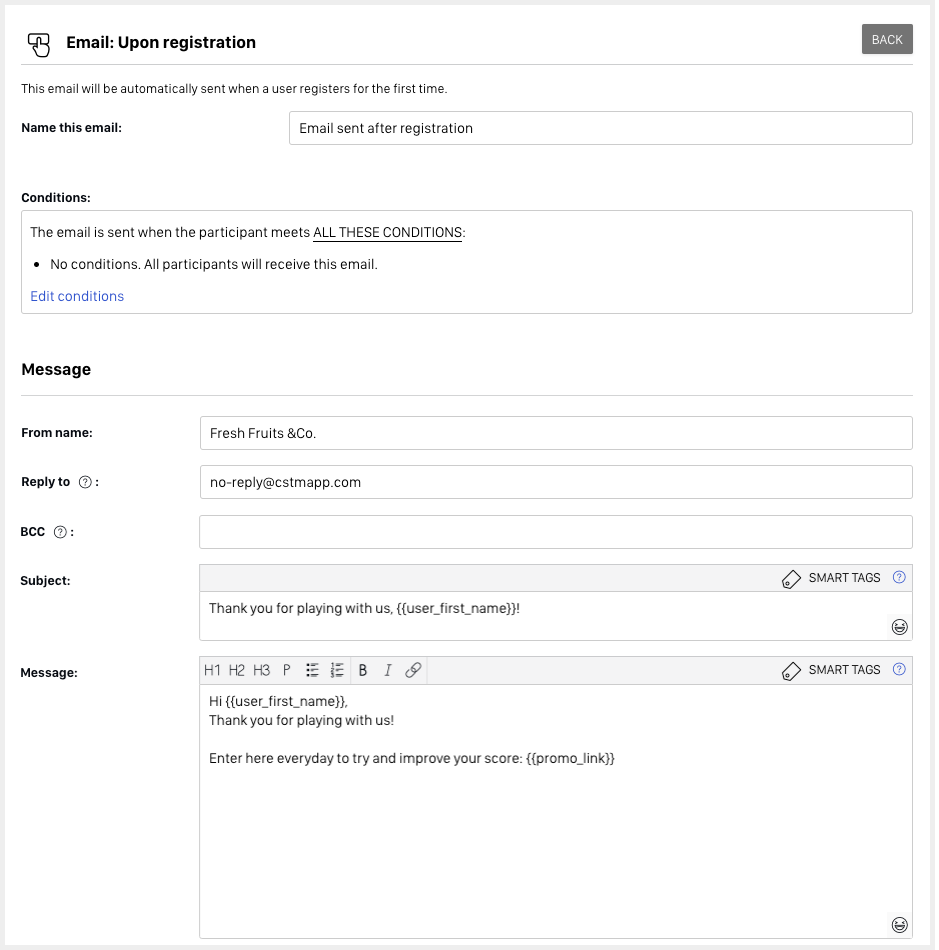
1. Thank users when they sign up for the promotion
-
2. Email the winners of a direct prize (Example: prizes from a Wheel, or Instant Wins)
-
3. Send each user the link to their individual entry in the gallery
-
4. Inform the users when their participation has been accepted and published.
-
5. Inform the users when their participation has been rejected
-
6. Send an email to the users who have voted in the gallery
-
7. Send a Manual Email to the Promotion Winners
1. Thank users when they sign up for the promotion
- Create a new email of the “Upon registration” type.
- In the "From name" field, type the name of the sender that participants will see when they receive the message. Optionally, in the "Reply to" field you can write the sender's address, if you want users to be able to reply to the email and contact you.
Note: If you do not set the sender address, by default it will be forced to no-reply@easypromosapp.com (in Basic and Premium promotions) and no-reply@cstmapp.com (in White Label promotions).
- Prepare the body of the email with the message you want to convey to the participants. Use "smart tags" to personalise the email with users information.
- By default, the email is saved as a draft but its sending is not activated. If you want it enabled, check the option "Activate the sending of this email".
- Review the general settings to configure the emails signature, and the header and footer images.
- Run a test if you want to visualise how the email will be presented and make sure that it is active.
2. Email for the winners of a direct prize (example: prizes from a Wheel or Instant Win)
- Create a new email of the "Upon winning a prize" type.
- In the "Conditions" section, apply the filter "Has won a prize" and then select the type of assignment, in this case, "Direct prizes".
-
Next, select if you want to send the same email to all the winners of the different prizes of the promotion, or just send it to the winners of a specific prize.
- In the "From name" field, type the name of the sender that participants will see when they receive the message. Optionally, in the "Reply to" field you can write the sender's address, so that users will be able to reply to the email.
Note: If you do not set the sender address, by default it will be forced to no-reply@easypromosapp.com (in Basic and Premium promotions) and no-reply@cstmapp.com (in White Label promotions).
- Prepare the email with the message you want to convey to the participant. Use "smart tags" to personalise the email. For example, use the "Prize" smart tag to add the name and information of the prize won to the message. You can also use the smart tag "Prize name" within the subject of the email.
- By default, the email is saved as a draft but its sending is not activated. If you want it to be activated, check the option "Activate the sending of this email".
- Review the general settings to configure the emails signature, and the header and footer images.
- Run a test if you want to visualise how the email will look like and make sure that the status is set to active so that it starts working.
Important: This type of email can only be set up when the promotion has the user participation flow enabled in "Identified Mode", where the user first identifies and registers and then participates. It is not possible to configure this type of email with the participation flow in "Visitor Mode.
3. Send each user the link to their individual entry in the gallery
If you have created a Voting Contest, a Photo Contest, a Video Contest, a PhotoFun, or a Scenes Contest, you can create an email that is automatically sent to each participant, including the direct link to the content they have uploaded in the gallery. This option is recommended to inform the user of the direct link to their participation and encourage them to share it.
2. In the option "What stage does it apply to?" select the stage corresponding to the stage where users upload the content (it will be named "Upload photos", "Upload images", etc.).
3. In the "From" field, write the name of the sender that participants will see when they receive the message. Optionally, in the "Reply to" field, you can write the sender's address, in case you want users to be able to reply to the email.
Note: If you do not configure the sender's address, by default it will be forced to no-reply@easypromosapp.com (in Premium promotions) and no-reply@cstmapp.com (in White Label).
4. Compose the email with the message you want to send to the participant. Use the "smart tag" {{entry_gallery_link}} in the body of the email. This will be translated into the link to each user's individual entry in the contest gallery.
5. By default, the email is saved as a draft but its sending is not activated. If you want it to be activated, check the option "Activate the sending of this email".
6. Review the general options to configure the email signature, and the images for the header and footer.
7. Run a test if you want to see how it will appear and ensure it is active so it starts working.
4. Informing users when their participation has been accepted and published
If you have created a Voting Contest, a Photo Contest, a Video Contest, a PhotoFun, or a Scenes Contest and have enabled content pre-moderation, you can schedule an email to be automatically sent to each participant when their participation has been approved. In the body of the email, you can include the direct link to the content they have uploaded in the gallery. This option is recommended to inform the user of the status of their participation's publication, encouraging them to share it.
Here are the steps you need to follow:
1. Choose the email type "Upon accepting a media entry":
2. In the option "What stage does it apply to?" select the stage corresponding to the content upload.
3. In the "From" field, write the name of the sender that participants will see when they receive the message. Optionally, in the "Reply to" field, you can write the sender's address, in case you want users to be able to reply to the email.
Note: If you do not configure the sender's address, by default it will be forced to no-reply@easypromosapp.com (in Premium promotions) and no-reply@cstmapp.com (in White Label).
4. Compose the email with the message you want to send to the participant. Use the "smart tag" {{entry_gallery_link}} in the body of the email. This will be translated into the link to each user's individual entry in the contest gallery.
5. By default, the email is saved as a draft but its sending is not activated. If you want it to be activated, check the option "Activate the sending of this email".
6. Review the general options to configure the email signature, and the images for the header and footer.
7. Run a test if you want to see how it will appear and ensure it is active so it starts working.
5. Informing users when their participation has been rejected
If you have created a Voting Contest, a Photo Contest, a Video Contest, a PhotoFun, or a Scenes Contest and have enabled content pre-moderation, you can schedule an email to be automatically sent to each participant when their participation has been rejected, informing them of the reason.
Here are the steps you need to follow:
1. Choose the email type "Upon rejecting a media entry":
2. In the option "What stage does it apply to?" select the stage corresponding to the content upload.
3. In the "From" field, write the name of the sender that participants will see when they receive the message. Optionally, in the "Reply to" field, you can write the sender's address, in case you want users to be able to reply to the email.
Note: If you do not configure the sender's address, by default it will be forced to no-reply@easypromosapp.com (in Premium promotions) and no-reply@cstmapp.com (in White Label).
4. Compose the email with the message you want to send to the participant. Use smart tags in the body of the email to personalize the message. Use this to inform the participant of the reason why their photo has been rejected.
5. By default, the email is saved as a draft but its sending is not activated. If you want it to be activated, check the option "Activate the sending of this email".
6. Review the general options to configure the email signature, and the images for the header and footer.
7. Run a test if you want to see how it will appear and ensure it is active so it starts working.
6. Sending an email to users who have voted in the gallery
If you have created a Voting Contest, a Photo Contest, a Video Contest, a PhotoFun, or a Scenes Contest, you can create an email to be automatically sent to each participant after they vote for content in the gallery. You can personalize the email to include the name of the candidate they voted for, as well as the direct link to the participation in the gallery.
Here are the steps you need to follow:
1. Create a new email of the type "On participating".
2. In the option "What stage does it apply to?" select the stage corresponding to the stage where users vote for content in the gallery.
3. In the "From" field, write the name of the sender that participants will see when they receive the message. Optionally, in the "Reply to" field, you can write the sender's address, in case you want users to be able to reply to the email.
Note: If you do not configure the sender's address, by default it will be forced to no-reply@easypromosapp.com (in Premium promotions) and no-reply@cstmapp.com (in White Label).
4. Compose the email with the message you want to convey to the participant. Use the following smart tags to personalize the content of the email:
- {{voted_entry_name}}: Displays the name of the content that the user has just voted for.
- {{voted_entry_link}}: Displays the direct link to the content that the user has just voted for.
5. By default, the email is saved as a draft but its sending is not activated. If you want it to be activated, check the option "Activate the sending of this email".
6. Review the general options to configure the email signature, and the images for the header and footer.
7. Run a test if you want to see how it will appear and ensure it is active so it starts working.
7. Send a Manual Email to the Promotion Winners
1. Create a new "Manual" type email.
2. In the "Conditions" section, apply the filter "Have won a prize" and then select the allocation method, in this case, "Direct Prizes".
3. Next, choose whether you want to send the same message to all winners, or personalize it based on the type of prize won.
4. In the "From" field, enter the sender's name that participants will see when they receive the message. Optionally, in the "Reply To" field, you can write the sender's address if you want users to be able to reply to the email.
Note: If you do not configure the sender's address, by default it will be forced to no-reply@easypromosapp.com (in Basic and Premium promotions) and no-reply@cstmapp.com (in White Label promotions).
5. Compose the email with the message you want to convey to the participant. Use "smart tags" to personalize the email. For example, use the smart tag "Prize" to add the name and information of the prize won in the message. You can also use the smart tag "Prize Name" for the email subject.
6. By default, the email is saved as a draft but sending is not activated. If you want it to be sent, check the option "Activate sending of this email."
7. Review the general options to configure the email signature, and images for the header and footer.
8. Test if you want to view how it will look and check that it is active to start functioning.




Comments
0 comments
Please sign in to leave a comment.