Tutorial: How to create a Knowledge Quiz Follow

The "Knowledge Quiz" application allows you to evaluate the knowledge of your target audience with a trivia type questionnaire. You will be able to mark the correct answers to each question and the application will automatically assign the points to the participants who get it right.
The content of the tutorial is as follows:
-
General description
-
How is the participation flow of the user
-
Create the promotion
-
Set up of the Knowledge Quiz
-
Create the questions and answers
-
Mark the correct answers
-
Set the minimum score to complete the Quiz
-
Customize the Quiz design
-
Customize the design and finish the settings
-
View the users who have completed the Quiz
-
Manage prizes and publish the winners
1. General description
With the Knowledge Quiz application you can create a question and answer contest to evaluate the knowledge of your followers and customers about your brand, products and services. The Knowledge Trivia will allow you to:
- Design the quiz completely tailored to your needs, personalized with photos, texts and videos.
- Combine different types of answers (single answer, multiple-answer and even sortable answers).
- Create as many questions as you want, and indicate which is the correct answer to each of them.
- Set a minimum score that the user must achieve for their quiz to be considered completed.
- Show custom final messages according to the number of correct answers in the Quiz.
- Reward the knowledge of the participants with a final draw among all the participants that have answered correctly the quiz questions.
2. How is the participation flow of the user
What will the user experience be like? The promotion is made up of different pages that the user will find when interacting with the promotion to participate, such as: the initial welcome page, the registration page, where the user will register with their data, the page that presents the questions of the quiz, etc. As a whole, the different pages will make up the structure of the promotion and the flow of participation that the user will follow to complete the promotional mechanics of the promotion.
Additionally, as the administrator, you can select which participation flow you want users to follow. Specifically, there are three different participation flows available: the Identified Mode, where the user must identify and register before playing; the Visitor Mode, where the user plays first and then identifies and registers; and the Anonymous Mode, where the user participates without identifying or registering. The choice of one mode or another will determine how participation and the user experience in the promotion will unfold.
3. Create the promotion
How to start creating the Spin the wheel promotion? We present the following tutorial that will allow you to know the first steps to create your promotion so that you do not miss any important point. You will learn all the general management options that you have available as an administrator in your internal dashboard to manage and edit the promotion.
4. Set up of the Knowledge Quiz
Set up the questionnaire with the questions you want to ask your participants. To do this, go to the promotion's "Editor":
Below are the steps you need to follow to customize your Quiz:
4.1. Create the questions
Then access the section Participation > Edit Knowledge Quiz and go under the Knowledge quiz tab.
When you access it, you will find the following configuration tabs:
The first step is to create the questions. Below, we explain the different types of questions you can set up:
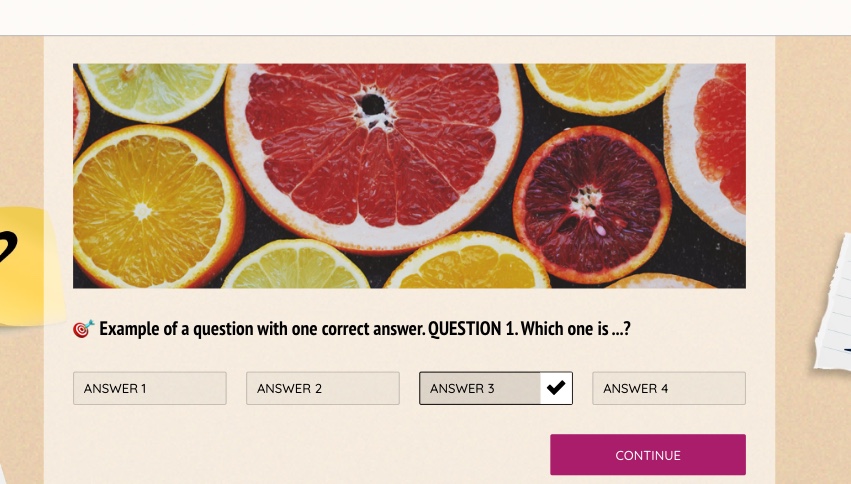
a) "Single answer" question: The participant will only be able to select one of the possible answers:
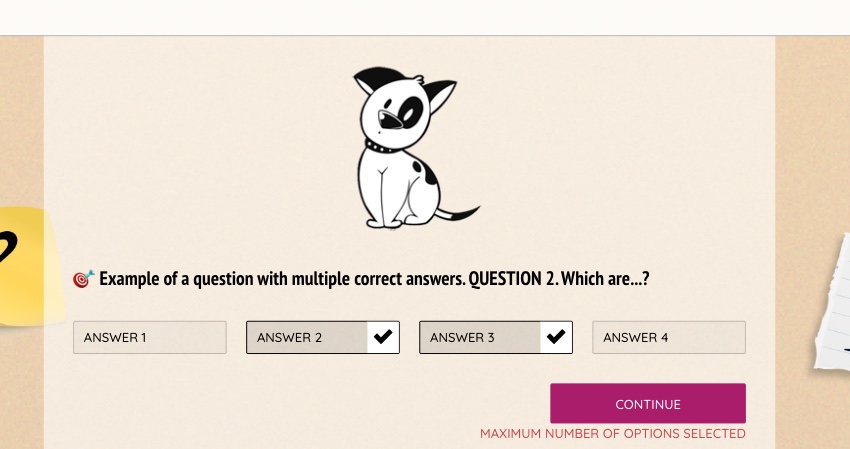
b) Multiple answer question: The participant may select more than one answer.
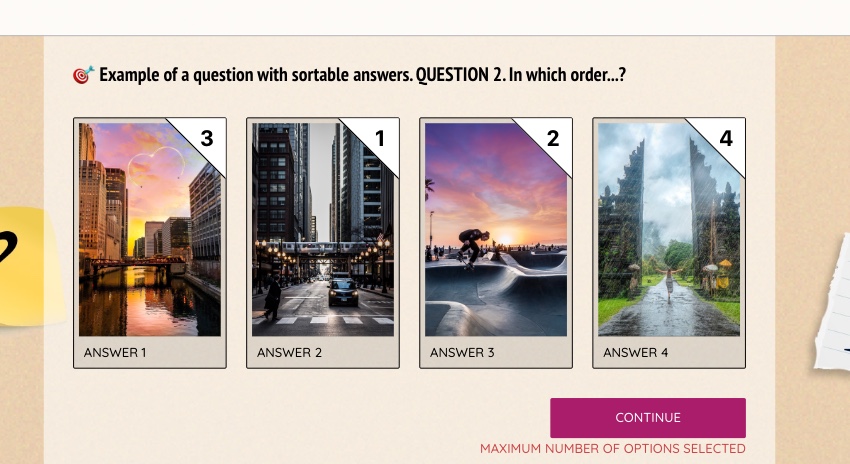
c) "Sortable answer" question: the participant must put the answers in order (using all the options or a set number of them).
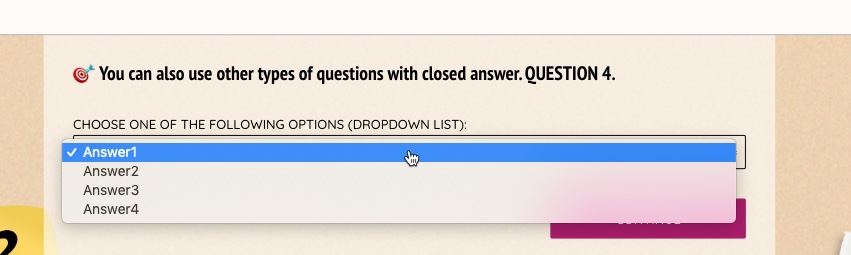
d) "Drop-down list" question: When the user places their cursor within the field, a list of possible answers is displayed.
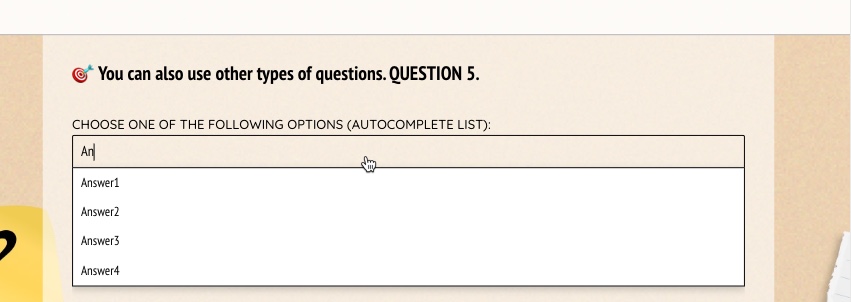
e) "Autocomplete list" question: When the user places their cursor within the field and starts to type, the page displays possible answers.
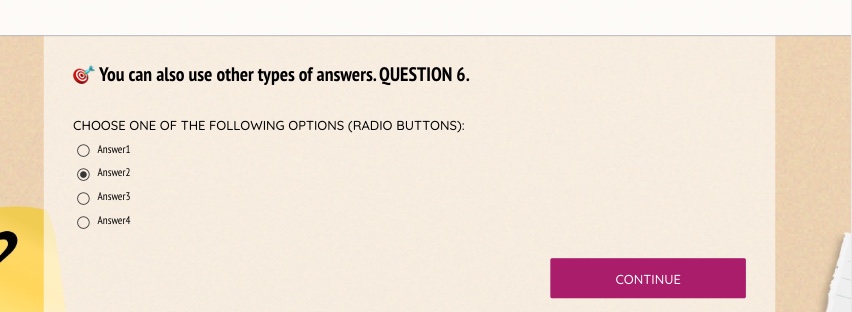
f) Radio button list: All the answer options are simultaneously displayed in a list format. The participant can select the answer they want.
Next, decide what type of question you want according to the Quiz you want to design. Once you are clear about the type of question you want, click on the "New question" button:
The following window will appear to guide you through the creation process. Choose the type of question that best suits your needs based on what you have in mind:
Tip! In a Knowledge Quiz where users have to guess the correct answer, we recommend choosing "Single Answer". This creates a multiple-choice question.
Below are the options available for configuring the question:
A. Contents of the Question
You will see the options for editing the question, which you must complete with your own content:
You'll find the following options:
- Question text: Type the question you want to ask users here.
- Upload Media: Decide if you want to accompany the question with an image or video.
- Position: If you upload an image for the question, choose between a horizontal or vertical display.
- Answers: Click on the pencil icon to rename each answer. Click on the "Add answers" button if you need to add more, use the copy response option to duplicate the answers or use the trash can icon if you need to delete answers.
B. Advanced options
Here you will find the options to set up your question:
- Feedback message text: You can present an informative text with the correct answer after users answer the question. You can customize different feedback messages for correct and incorrect answers.
- Hide Question text: In case your image already includes the text of the question.
- Container columns: It will allow you to indicate how many answers you want to show per row.
- Do not force 1 column-view for mobile devices.
- Question type: In case you need to modify the type of question you have initially created.
- Hide Continue button: Check this option if you want the user to move to the next question by just clicking on the answer buttons. By default, the Continue button is displayed in closed answers to allow users to move forward to the next questions of the quiz.
In case of a "Multiple-answer" question, you'll find the additional options:
- Minimum/Maximum of answers: It indicates the minimum and maximum number of answers that users can select.
-
Select the scoring system: It will allow you to choose between:
- Give the points for each correct answer selected: for each answer that is correct the user will be awarded the number of points indicated for that particular answer.
- Give one single point if all the correct answers are selected: The question will only be considered to have been answered correctly if all the answers are correct. In this case, the user.
Note: Check the scoring system tutorial for more information.
4.2. Mark the correct answers
Once you have created the Knowledge Quiz, it's time to score the questions. You must indicate the correct answer to each question and assign a number of points, so that the application can calculate participants' scores. Learn how to score questions with this tutorial.
Example: For the elaboration of this tutorial a fictional Knowledge quiz has been used that asks a series of questions related to Christmas, with the aim of evaluating the knowledge that users have about Christmas holidays.
Practical example
The following question "Which country does the tradition of the Christmas tree come from?" presents three possible answers:
a) Finland
b) Germany
c) England
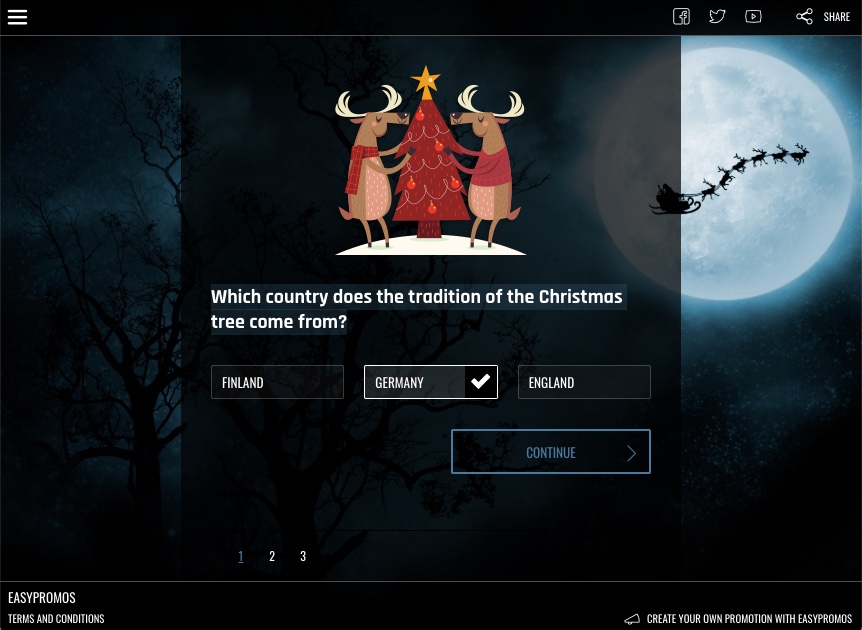
You should punctuate the correct answer to the question with "1" point:
4.3. Customize the Quiz design
Next, click on the "Design" tab to personalize the design and look & feel of the Quiz.
A. Questions
Here you will find the option “Center question text”, which allows you to apply this style to the question text.
B. Answers
You’ll find the following options to customize the Trivia answer buttons:
- Font style
- Force uppercase
- Text color
- Background color
- Border width
- Border color
C. Answers (hover)
You can customize the appearance of the answer buttons when the user hovers over them:
- Text color
- Background color
- Border color
D. Selected answers
You can customize the style of the selected answer button(s) using the following options:
- Checkmark color
- Checkmark background color
- Text color
- Background color
- Border color
E. Continue Button
By enabling the “Override default button styles” option, you’ll be able to customize the Continue button using the following options:
- Text color
- Background color
- Text color (on hover)
- Background color (on hover)
F. Options
This section allows you to configure additional settings:
- How do you want to display progress? It lets you define the style of the progress bar or even disable it.
- Allow users to change their answers.
4.4. Set the minimum score to complete the Quiz
In the “Final messages” tab, you will find the following two configuration options:
A. Minimum score to complete the quiz
This option allows you to set the minimum score required to complete the quiz, that is, the minimum number of points the user must achieve for their quiz to be considered completed.
Practical example: In a knowledge trivia with 4 questions, where each correct answer scores 1 point, a minimum score of 3 points is set.
This means that the system will consider the quiz completed if the user has answered at least 3 out of the 4 trivia questions.
Close participation once the trivia is completed
If you define a minimum score, you can also enable the option “Prevent users from participating more than once after completing the stage”, which closes the stage for the user once they have completed the trivia, so they will not be able to participate again.
You can activate this option by checking the following box, which is available in the stage configuration options:
B. Create final messages based on correct answers
If you want the participant to receive a personalized message based on their result on the final quiz page, you can create different final messages:
Check here how to create personalized final messages based on the score.
If you also want the participant to share their quiz result message with their friends, you can configure the viral content for each result message.
Check here how to configure the viral content for each created final message.
5. Customize the design and finish the settings
Once you have configured the Timed Quiz, the next step is to finish the configuration of the other options of the promotion, such as customizing the design template with your own colors and texts, introducing the legal bases, the viral content settings, etc.
Check the tutorial to finish the configuration and customization of your promotion.
6. View the users who have completed the Quiz
Once the promotion has ended, you can quickly get the list of users who have completed the Quiz from the promotion’s User Manager.
To do this, follow these steps:
1. Click on the “Users” menu of the promotion:
2. Next, click on “Filter” and apply the filter Stages > Stage completed:
3. The system will display the list of participants who have completed the quiz.
Additionally, you can view the details of a participant to check if they have completed the quiz:
Finally, you can also export the list of promotion entries, which includes an additional column called “completed” indicating whether the participant has completed the trivia or not.
Check here for detailed information on how the promotion’s User Manager works.
7. Manage prizes and publish the winners
Easypromos provides a complete Prize and Winners Management system that will allow you to create the prize or prizes that you want to give to the users who participate in the Quiz, as well as configure how you want to assign the prizes and select the winners.
Specifically, you have two ways to assign the prize to the winners, depending on your preference:
1. Carry out a draw among all the users who have participated in the Quiz. Follow the steps of this tutorial to create the prize and draw it among all the participants.
2. Carry out a draw only among users who have completed the Quiz. Follow the steps in this tutorial that explains how you can create the prize to be raffled among the participants who have answered all the Quiz questions.
3. Give a coupon to all users who have participated. Follow the steps in this tutorial that explains how to create the promotional coupon type prize to assign it directly to all users after participating in the Quiz.
Comments
0 comments
Please sign in to leave a comment.